A Comprehensive Guide to Water Heater Switch Wiring by Langer Electric
A Comprehensive Guide to Water Heater Switch Wiring by Langer Electric
Blog Article
When it comes to installing or upgrading your water heater, understanding the importance of proper water heater switch wiring is crucial. Ensuring the right connections not only guarantees the safe and efficient operation of your system but also enhances its lifespan. Whether you're considering a DIY installation or hiring a professional, knowledge of the water heater switch wiring process is indispensable.
In this extensive guide by Langer Electric, we dive deep into the essentials of water heater switch wiring. From basic wiring principles to the specific components needed for a successful installation, we’ll cover everything you need to know to get the job done correctly.
What is Water Heater Switch Wiring?
Water heater switch wiring involves the electrical connections that control the flow of power to your water heater. It serves as the link between your home's electrical system and the heater itself, allowing you to control its operation through a switch. This wiring ensures that your water heater can be safely turned on or off as needed, while also protecting the system from potential electrical hazards like short circuits or overloads.
Key Components Involved in Water Heater Switch Wiring
To wire a water heater switch properly, several key components are involved. Understanding each of these components and their function will help you make informed decisions throughout the wiring process.
- Water Heater Switch: The switch itself is the main component used to control the power supply to your water heater. It's typically installed near the heater for easy access, allowing you to turn the unit on or off as needed.
- Circuit Breaker: A circuit breaker helps protect your water heater and home from electrical overloads by interrupting the power flow when a fault is detected. For water heaters, it's essential to have an appropriately sized breaker to handle the required load.
- Electrical Wiring: The wiring used for the water heater switch wiring must be rated for high temperatures and capable of handling the electrical load of the heater. Usually, this involves a two-wire or three-wire system, depending on whether you have a single-phase or three-phase water heater.
- Grounding: Proper grounding is vital for electrical safety. It ensures that in the event of a fault, excess electricity is safely diverted to the ground instead of posing a risk to the system or users.
- Electrical Box: An electrical box is necessary to house the switch and connections. It protects the wiring and ensures that all connections are safely contained within a dedicated space.
Steps for Water Heater Switch Wiring
Wiring your water heater switch involves several steps. Here’s a step-by-step guide to help you ensure a proper installation:
Step 1: Turn Off the Power Supply
Before starting any electrical work, always ensure the power to the circuit is completely turned off. This is crucial for your safety.
Step 2: Install the Switch Box
The switch box should be mounted at an accessible height near the water heater. Ensure it is securely fastened and positioned so that the switch is easy to operate.
Step 3: Run the Electrical Wire
Run the electrical wire from the main electrical panel to the switch box and then to the water heater. Be sure to use wire rated for the voltage and current required by the water heater.
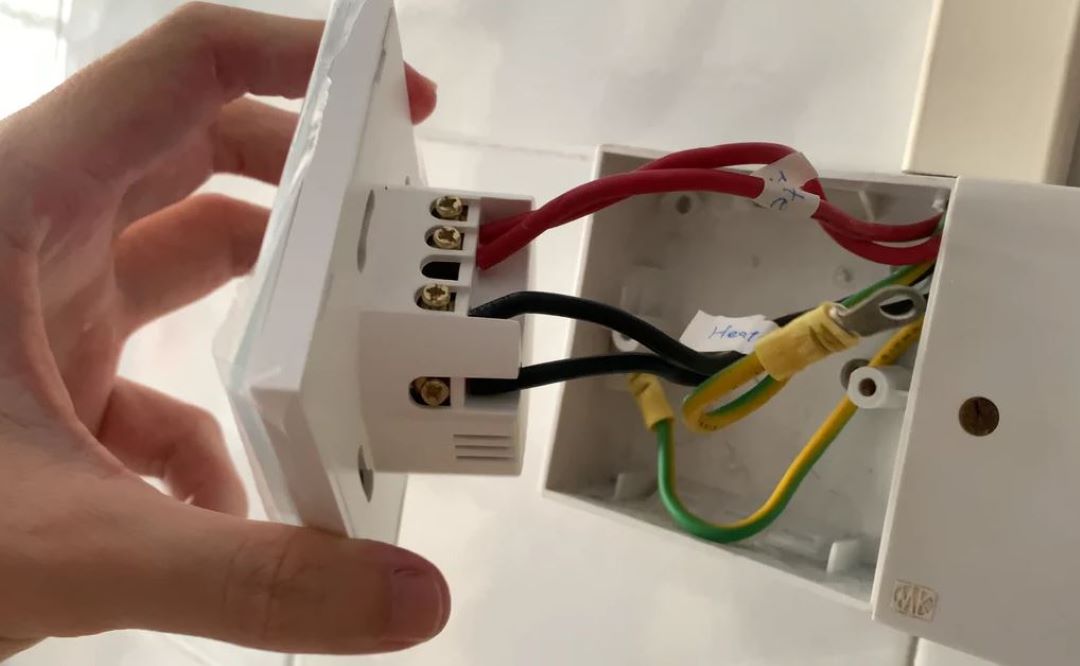
Step 4: Connect the Wires to the Switch
In the switch box, connect the hot wire (usually black or red) to the terminal on the switch. Then, connect the neutral wire (white) to the neutral terminal. If you are using a grounding wire (typically green or bare copper), connect it to the grounding terminal of the switch box.
Step 5: Connect Wires to the Water Heater
At the water heater, connect the wires to the corresponding terminals. Be sure to double-check that the connections are tight and secure, and that the ground wire is properly attached to the grounding terminal of the water heater.
Step 6: Secure the Wiring and Switch
Once all connections are made, secure the switch in place within the box and tighten any screws to ensure the wiring is neatly organized and safe. Install the cover plate to the switch box to keep the wiring contained.
Step 7: Test the System
Finally, turn the power back on and test the switch. The water heater should power on and off smoothly, indicating the wiring is correct and functioning as expected.
Common Issues with Water Heater Switch Wiring
Even when following the correct steps, there are a few common issues that can arise with water heater switch wiring. It's important to be aware of these problems and how to address them:
- Improper Circuit Breaker Size: If the circuit breaker isn’t sized correctly for the water heater’s power requirements, it can either trip too frequently or fail to protect the system in the event of an overload.
- Loose Connections: Loose wiring connections can result in intermittent power loss, overheating, or even fire hazards. Always ensure that all connections are tight and secure.
- Grounding Issues: A poor or missing ground connection can lead to electrical shocks or damage to the system. Double-check that the grounding wire is connected properly at both the switch and the water heater.
- Incorrect Wire Size: Using the wrong gauge wire for your water heater can result in overheating or insufficient power delivery. Make sure the wire size matches the water heater's requirements.
- Code Violations: Always check local electrical codes before starting your installation. Wiring codes ensure the safety of the installation and may vary by location.
Why You Should Hire a Professional
While it’s tempting to take on the wiring of your water heater switch yourself, there are significant risks involved. If you’re not confident in your electrical skills, hiring a licensed electrician is always the safer choice. A professional, like those from Langer Electric, will ensure the wiring is done correctly and up to code, minimizing the risks of electrical faults, fire hazards, or damage to your system.
Conclusion: Ensuring Safe and Efficient Water Heater Operation with Langer Electric
Proper water heater switch wiring is vital for both safety and functionality. With the correct installation, your water heater will operate efficiently, and you can avoid potential issues like electrical faults or overheating. By following this detailed guide, you can confidently tackle the wiring process or make an informed decision when hiring a professional.
Remember, the wiring process is not something to take lightly, and if you're unsure about any part of the installation, don't hesitate to contact Langer Electric. Our expert electricians are here to assist with the proper installation of your water heater switch wiring and ensure your home remains safe and comfortable.
If you have any questions or need assistance with water heater switch wiring, reach out to Langer Electric today for expert guidance and service!
Report this page